Godot Selectable Map Tutorial
Tue Oct 27 2020
A tutorial in which I will show you how to make selectable maps for grand strategy games. Using the Godot game engine.
Intro
In this tutorial we will explore how to make complex selectable areas using a shader. This technique can be used to make complex maps that are found in grand strategy games. I will use Godot and GDScript for this tutorial but the concepts are applicable to any language or game engine.
You can find the complete project at the following repository. It will be easiest to clone and start up the project and then follow along with the rest of the tutorial.
Demo
The concept
The general concept is given in the following diagram: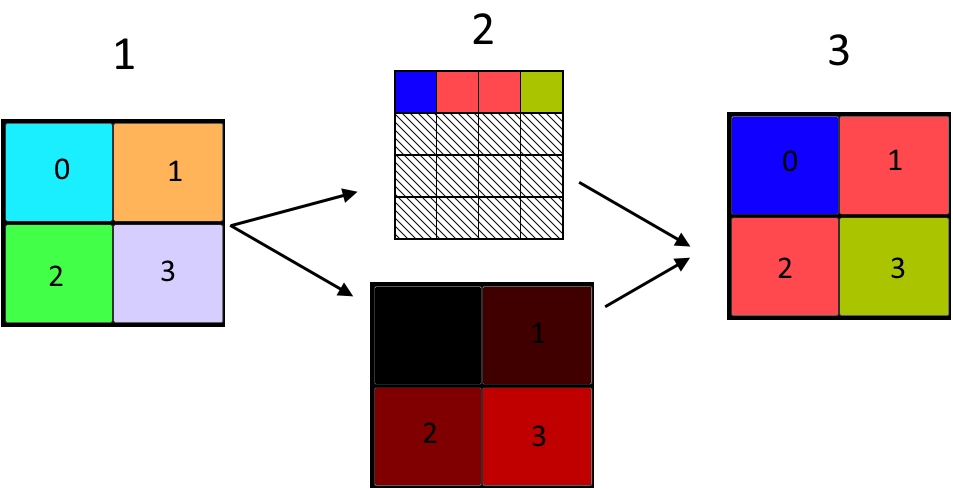
- The original image. Each area has a unique colour. Make sure to disable mipmaps, filters, srgb, etc. We will need to have the original textures colours for this to work as intended.
- We convert the map into 2 textures. The top is the texture that will hold the final colours of the areas. The bottom image is a lookup texture that has the uv coordinates of for each areas final colour in the texture above. Both these textures will be used as uniforms in the shader.
- The final output of the shader. It uses the lookup texture's uv coordinates to sample the colour texture much like a pallet shader. Resulting in the final output.
For selecting an area we can get the area's id by reading the pixel of the original map texture at the mouse coordinates when the mouse is clicked. We use that pixel's colour to read a dictionary to get the area that is clicked on.
The scene set up
We will use the following scene set up: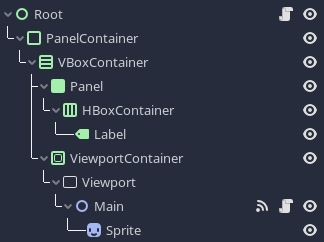
There are 4 nodes that are of importance:
- Root: This node is fairly simple and only updates the Label node when an area gets selected.
- Label: This node simply displays which area is selected.
- Main: A Node2D. This node will contain essentially all the logic.
- Sprite: A Sprite node. This node has the shader. And of course the actual image to display.
Root node
The root node's script is fairly straight forward:
extends Control
onready var label = $PanelContainer/VBoxContainer/Panel/HBoxContainer/Label;
func _ready():
pass
func _on_Main_selected_area(area):
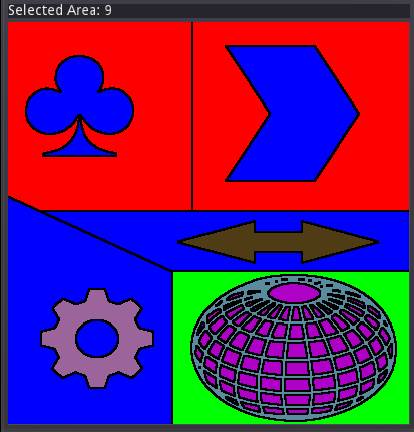
label.set_text("Selected Area: " + str(area))
The only thing of note in this script is the _on_Main_selected_area() function. This function is invoked by the Main node's selected_area signal. Which we will go over later in the "Area Selction" subsection. To find out more about signals and the observer pattern in the Godot engine you can read this article in the Godot docs.
The Main Node
For the Main node we have the following members.
extends Node2D

const DIM = 10;

onready var sprite = $Sprite;

var lookup_texture;
var map_texture;
var color_texture;

var areas = {}
var owners = {}

signal selected_area(area)- sprite is a Sprite node that contains the texture and shader.
- lookup_texture is the resulting texture that will be the converted uv coordinates.
- color_image is the original texture that will define the areas and the color code.
- DIM is the the dimensions of color_image. So a value of 10 means that there can be 10x10=100 areas.
- areas is a dictionary that will hold all the areas, the keys will be the color of the area. And the value will be a dictionary with 3 keys: id, color and owner.
- owners is a dictionary that will hold all the owners, the keys will be the id of the owner. And the value will be a dictionary with 2 keys: id and color.
- selected_area is a signal that will be invoked when we click on the image.
We will initialize everything in the _ready() function:
func _ready():
	load_data()
	generate_map()
Loading the data
We need some way to store the area and owner info. We will be using 2 JSON data files. One for the owners and one for the areas. These files are called areas.json and owners.json respectively. We will parse the files and store the results in the areas and owners dictionaries. To find out more about files you can read this article in the Godot docs. And for the usage of JSON you can read this article.
areas.json has the following structure:
[
	{
		"id" : 1,
		"color" : [0, 100, 100],
		"owner" : 2
	},
    ...
]
and owners.json has the following structure:
[
	{
		"id" : 0,
		"color" : [255, 0, 0]
	},
    ...
]
The load_data() function will call the load_file() function to get the contents of the file. And then pass that data to the parse_area() or parse_owner() functions. These functions are responsible for populating the areas and owners dictionaries with the given data:
func load_data():
	var json = JSON.parse(load_file("areas.json"))
	if typeof(json.result) == TYPE_ARRAY:
		for area in json.result:
			parse_area(area);
	else:
		push_error("Unexpected results.")

	json = JSON.parse(load_file("owners.json"))
	if typeof(json.result) == TYPE_ARRAY:
		for owner in json.result:
			parse_owner(owner);
	else:
		push_error("Unexpected results.")
The load_file() function reads a file at the given path and returns its contents:
func load_file(path : String):
	var file = File.new()
	file.open("res://" + path, File.READ)
	var content = file.get_as_text()
	file.close()
	return content
And finally we add the area or owner to the respective dictionary in the parse functions. We also make sure that the data is the right types.
func parse_area(data):
	data.color = Color8(data.color[0], data.color[1], data.color[2])
	data.id = int(data.id)
	data.owner = int(data.owner)
	areas[data.color] = data

func parse_owner(data):
	data.color = Color8(data.color[0], data.color[1], data.color[2])
	data.id = int(data.id)
	owners[data.id] = data
We now have all the data needed to generate the map textures.
Map texture generation
In the generate_map() function we will handle all the logic of generating the map textures and sending the textures to the shader. First we will get the map texture data from the sprite with get_data(). Next we initialize lookup_texture and color_texture. lookup_texture will be the lookup texture of UVs that will be used in the shader to sample the color_texture texture.
func generate_map():
	map_texture = sprite.texture.get_data();

	lookup_texture = Image.new();
	lookup_texture.create(400, 400, false, Image.FORMAT_RGBF);

	color_texture = Image.new();
	color_texture.create(DIM, DIM, false, Image.FORMAT_RGBF);

	lookup_texture.lock();
	map_texture.lock();
	color_texture.lock();
We will then traverse the original image. Get the pixel colour at the coordinates. Use that colour to get the area id from the areas dictionary. We will then use the area_id to get a UV coordinate, which we store in the variable uv. And finally we set the pixel of lookup_texture at the current coordinate to uv. This will be used by the shader to sample color_texture.
for x in range(map_texture.get_width()):
	for y in range(map_texture.get_height()):
		var area_id = areas[map_texture.get_pixel(x, y)].id;
		var uv = Vector2((float(area_id % DIM)/ (DIM - 1)), (floor(area_id/DIM) / (DIM - 1)));
		lookup_texture.set_pixel(x, y, Color(uv.x, uv.y, 0.0));
We will also have to iterate over all the areas. We calculate the coordinates on the color_texture for the id. And then we set the color_texture pixel color at those coordinates to the color of the area.
for area in areas:
	var uv = Vector2((float(areas[area].id % DIM)), (floor(areas[area].id / DIM)));
	color_texture.set_pixel(uv.x, uv.y, owners[areas[area].owner].color)
Finally we will create ImageTextures from lookup_texture and color_texture. And pass these to the shader. The color_texture image is the texture you want to update if you want to change any of the areas colours at run time. And then pass it to the shader again.
color_texture.unlock();

var itex = ImageTexture.new();
itex.create_from_image(lookup_texture, 0);
sprite.material.set_shader_param("lookup_texture", itex);

var itex2 = ImageTexture.new();
itex2.create_from_image(color_texture, 0);
sprite.material.set_shader_param("color_texture", itex2);
Area Selection
The last thing is to be able to select the area. First we get the colour of the lookup_texture under the mouse. The colour will be passed to the shader so that it can show which area is selected. Then we get the colour of the map_texture at the mouse position. We use that colour to get the area id from areas. And finally we emit the selected_area signal with that id. The signal will be handled in the root node.
func _input(event):
	if event is InputEventMouseButton:
		var mouse_pos = Vector2(event.position[0], event.position[1])
		sprite.material.set_shader_param("selected_area", lookup_texture.get_pixelv(mouse_pos));
		var color = map_texture.get_pixelv(mouse_pos);
		emit_signal("selected_area", areas[color])
The Shader
The shader is rather straight forward. We need 3 uniforms: 2 sampler2Ds and a vec4. lookup_texture is the texture that contains the uv coordinates to check on the color_texture. The color_texture of course contains the final colours for the areas. And finally selected_area. This is simply the colour that is currently selected.
shader_type canvas_item;

uniform sampler2D lookup_texture;
uniform sampler2D color_texture;
uniform vec4 selected_area;
We need a way to check whether 2 colours are the same. Unfortunately, due to floating point precision, we can not simply check whether 2 vectors are equal. Thus we need to check whether they are similar enough. We use the following utility function to achieve that.
Note: I'm using 0.05 as a threshold. However, as you increase the number of areas you increase the size of color_texture and therefore the UVs will need more precision. 0.05 does seem to be working just fine for my own project which has room for 10k areas though.
bool is_same_color(vec3 a, vec3 b){
	vec3 diff = abs(a - b);
	return  diff.r < 0.05 &&  diff.g < 0.05 &&  diff.b < 0.05;
}
The last part is the fragment function of the shader. We sample the lookup_texture uniform at the current UV coordinates. This will give us the coordinates that we use to sample the color_texture. We set the final COLOR to the result of the sample operation. We then check the surrounding pixels in a for loop to check whether its an edge of the area. If it is we set the colour to black to create a simple outline for the areas. Finally we check whether the current COLOR is the same as the selected colour. And we set COLOR to white if it is.
void fragment() {
	vec4 lookup_uv = texture(lookup_texture, UV);
	COLOR = texture(color_texture, vec2(lookup_uv.x, lookup_uv.y));

	for(int i = -1; i < 2; i++){
		for(int j = -1; j < 2; j++){
			vec4 check_color = texture(lookup_texture, vec2(UV.x + (TEXTURE_PIXEL_SIZE.x * float(i)), UV.y  + (TEXTURE_PIXEL_SIZE.y * float(j))));
			if( check_color != lookup_uv){
				COLOR = vec4(0.0,0.0,0.0,1.0);
			}
		}
	}

	if(is_same_color(lookup_uv.rgb, selected_area.rgb)){
		COLOR = vec4(1.0,1.0,1.0,1.0);
	}
}
Conclusion
This technique allows the creation of interesting and complex maps. Like the south of Mexico on the world map in a project of mine, for example:
Although it might be easier to use collision bodies or Area2Ds when having just a few areas. This solution is significantly more scalable. As it would allow having thousands of areas.
Another use case would be in procedural generation. With voronoi diagrams you could potentially generate some really interesting procedurally generated maps.
Something to keep in mind for in production usage is the performance of the map conversion. It is 'fast enough' when using GDScript on small textures and few areas. But I'd recommend implementing the conversion in GDNative for anything larger. You could also save the results of the conversion to file and check on launch if the map is in need to be updated. That way you are not running it on every launch.
Sources
A great source to read up on is Optimized Gradient Border Rendering in Imperator: Rome by Bartosz Boczula and Daniel Eriksson. Although the article's primary focus is on how they used and optimized border generation using signed distance fields and a jump flood algorithm, it also provides some insights in how Paradox Interactive creates their maps.